Writing with Scrivener made easy for you
…a hands-on explanation of how to start lightly!
Yes, I can only recommend this magical tool. In my opinion, every writer should at least give it a go and try. You’ll never look back to Word once you’ve got the (rough) hang of Scrivener.
I admit it’s daunting, and even authors working with it all the time are probably not using all the functions available. But then – you never use them all at once anyway, do you? And you don’t have to understand it all at once either.
So one step after the other.
First: Read the manual that comes with Scrivener. Take your time. It’s very detailed, and yes, too detailed to not be scared. But relax – you won’t need all the info to start using Scrivener. Just try the little training tasks they assign. Play around. You can’t crash the thing, and you’ll learn faster by doing it than by reading it.
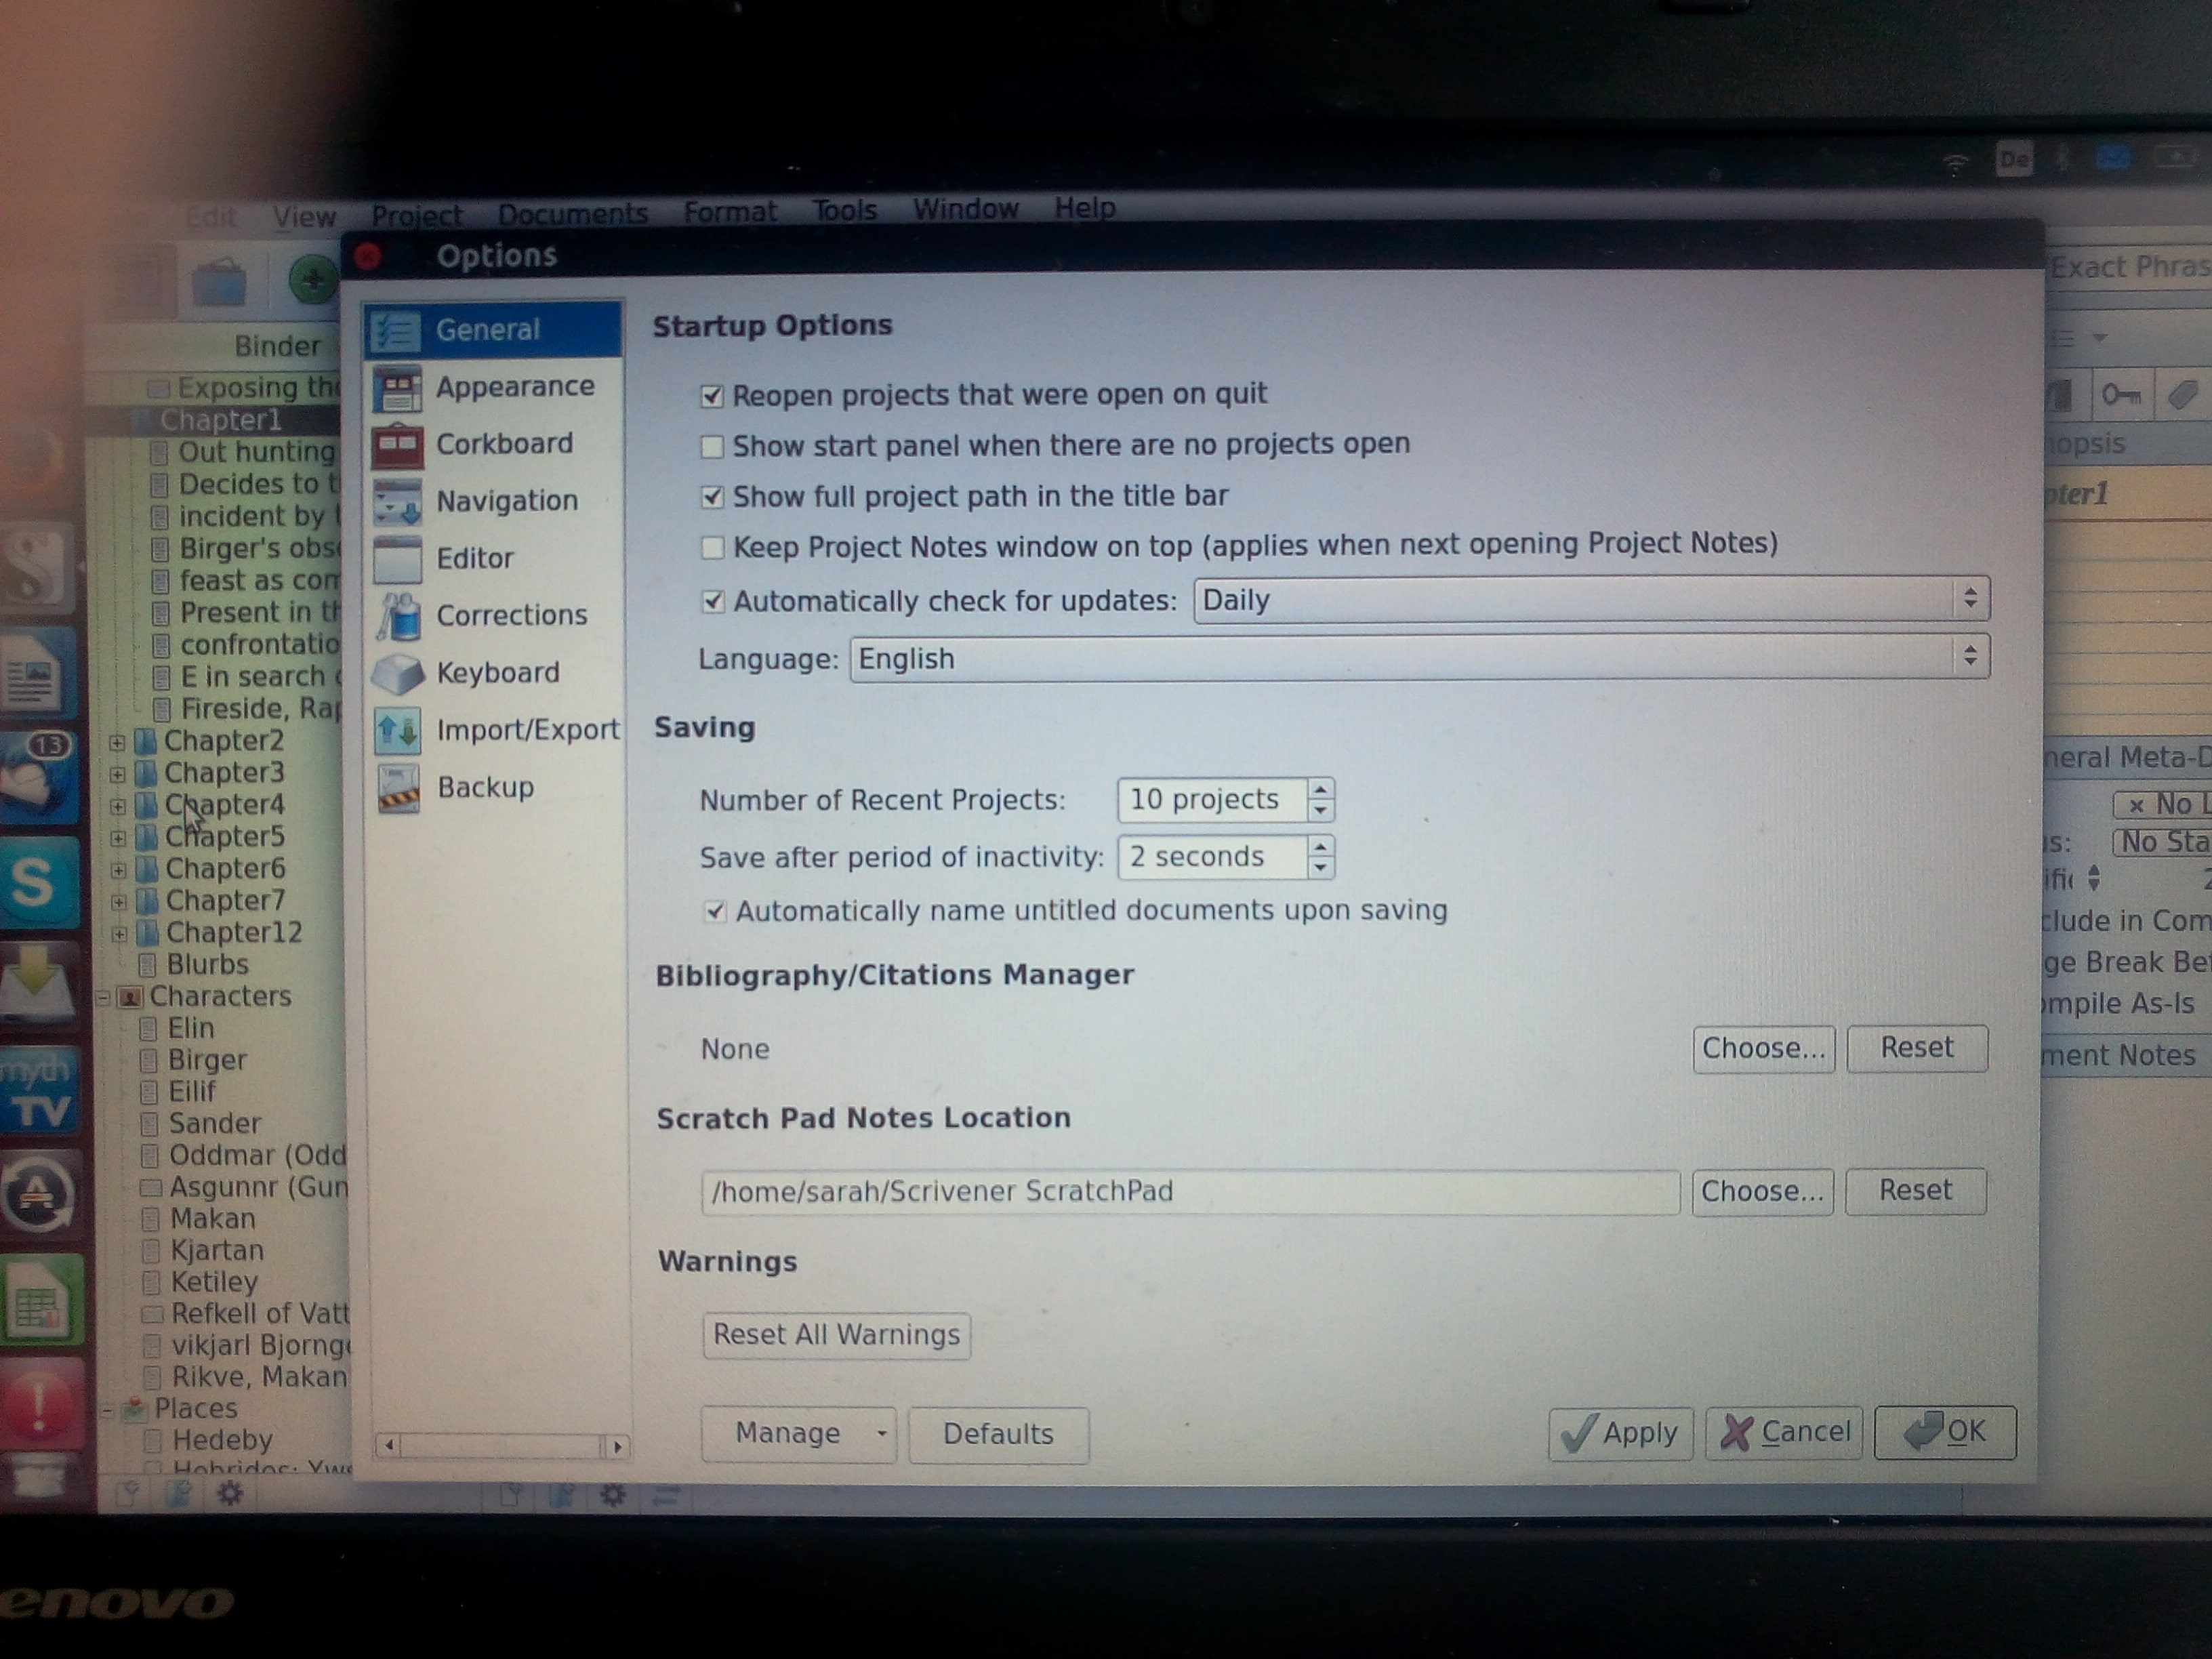
“Tools – Options”
The basic setup is important, because it’s your fast-track to your preferred settings. What you want your text to look like while typing the story (while you’re writing it, not finally! Everything else, the output, or compile, later on can be changed according to what you need the text to look like in its final stage.) Go to “Tools – Options” and then work through the points that interest you. Fonts, margins, colours, etc. Very important, and well worth putting the effort in. Once this is set up, you could theoretically write every story with your preferred settings, or go back there and use different settings for every story, just as you like.
All in one place
Scrivener’s strongest point in comparison to Word is that you have just the ONE source text (and Scrivener automatically takes snapshots of it to save its stages, so you can go back to earlier versions at any time), and you can from there compile the story into every format you need. As e-book, for editing, for print, in dozens of formats you can choose from or you set up your own – beforehand. There are no limits and it’s a very fast way to get what you want for the type of output you want from the text.
For example: I have several setups. One is for my own printout-editing for editing drafts. Now I only choose “File” – “Compile As- “Sarah_foredits” and print the compiled text in the formatting I set up for my handwritten editing: wide margins, space and fonts etc.
Whatever you choose as your compile option, the source text is NOT changed by this!
This also forces you to make all the changes in this one place, the source text. There is always your one, current file you work with, and you just alter its output, the compiles, for your needs. So much less complications with several files in different formats! Scrivener keeps it all tidy, and you choose what you need the text to look like for each use.
In Scrivener, it’s always the one, recent version to work with. From there you edit and from there you compile your output texts, in short-cut if you’ve setup your preferences for every task. BUT you can go back to earlier snapshots if you prefer another version.
So how do you start?
Read and work with the manual, do their little assignments, and then start with something small. A short story, something that doesn’t need complicated chaptering.
You click “New Project” and choose the type of project you want to do. Fiction, non-fiction, novel, short story etc. You also choose where and how to save it. BEWARE: never alter the location of your .scriv-file while working on it, so choose wisely! Otherwise you’d pull out the rug from under Scrivener, and it can’t locate your project anymore if you altered the name or location. All the snapshots and metadata etc. go in this chosen place. Keep it there.
Then you do your setup, as described above, “Tools – Options” etc. Play around with these, nothing can go wrong here.
If then you’re in your file, ready to write, just do. Don’t worry about the left and right-hand margins and the dozens of options there. You’ll naturally find what you may need later and can ignore what you don’t need. It’s what I did when I couldn’t make sense of the vast range of options. Bit by bit, I found what I needed, with the help of trial and error or the manual.
So what do you see in that confusing “Project” view?
Keep this picture in mind, I’ll guide you through its important parts:

General project view – your workplace
If it’s a short story you write, just type down in the general project view until you finished. There are no “pages” (unlike Word), you organise your own structure.
If you work on a novel, or something that needs chaptering, I’d recommend you go into the “binder” to the LEFT and organise some files (scenes) and folders (chapters) first. This is done by drag-and-drop or double-click.
I try to write every scene into one new file, which means the binder-content to the left can become a very long list. Never fear. It’s much easier to work with that organised view. The scenes can then be packed into “folders”, and you can open or close them in the binder view while working.
The project-“binder” is your contents, your structure. For longer works, the binder helps to keep an eye on the organisation, the chaptering, the subfiles, even additional info that doesn’t go INTO the text. Further down you can add People, Places, Research (pics or files), etc. Whatever you want. I love that you can see all the additional info you may need, for example the notes you took about your characters, even pics of what they look like, without leaving your text. Word can’t do that.
For my longer Viking shieldmaiden project I have a very complicated chaptering and long additional list of people and places (see above), along with pics and notes. I can click on anything WHILE I’m writing in Scrivener and it’s there, at a glance. For example: what did I say my shieldmaiden’s love-interest was? Half-Swede or half-Dane? One click on the left, at “People – Kjartan” (his name) and I have all the notes about his parents and upbringing.
For shorter works, you can just type along and ignore all these options 🙂
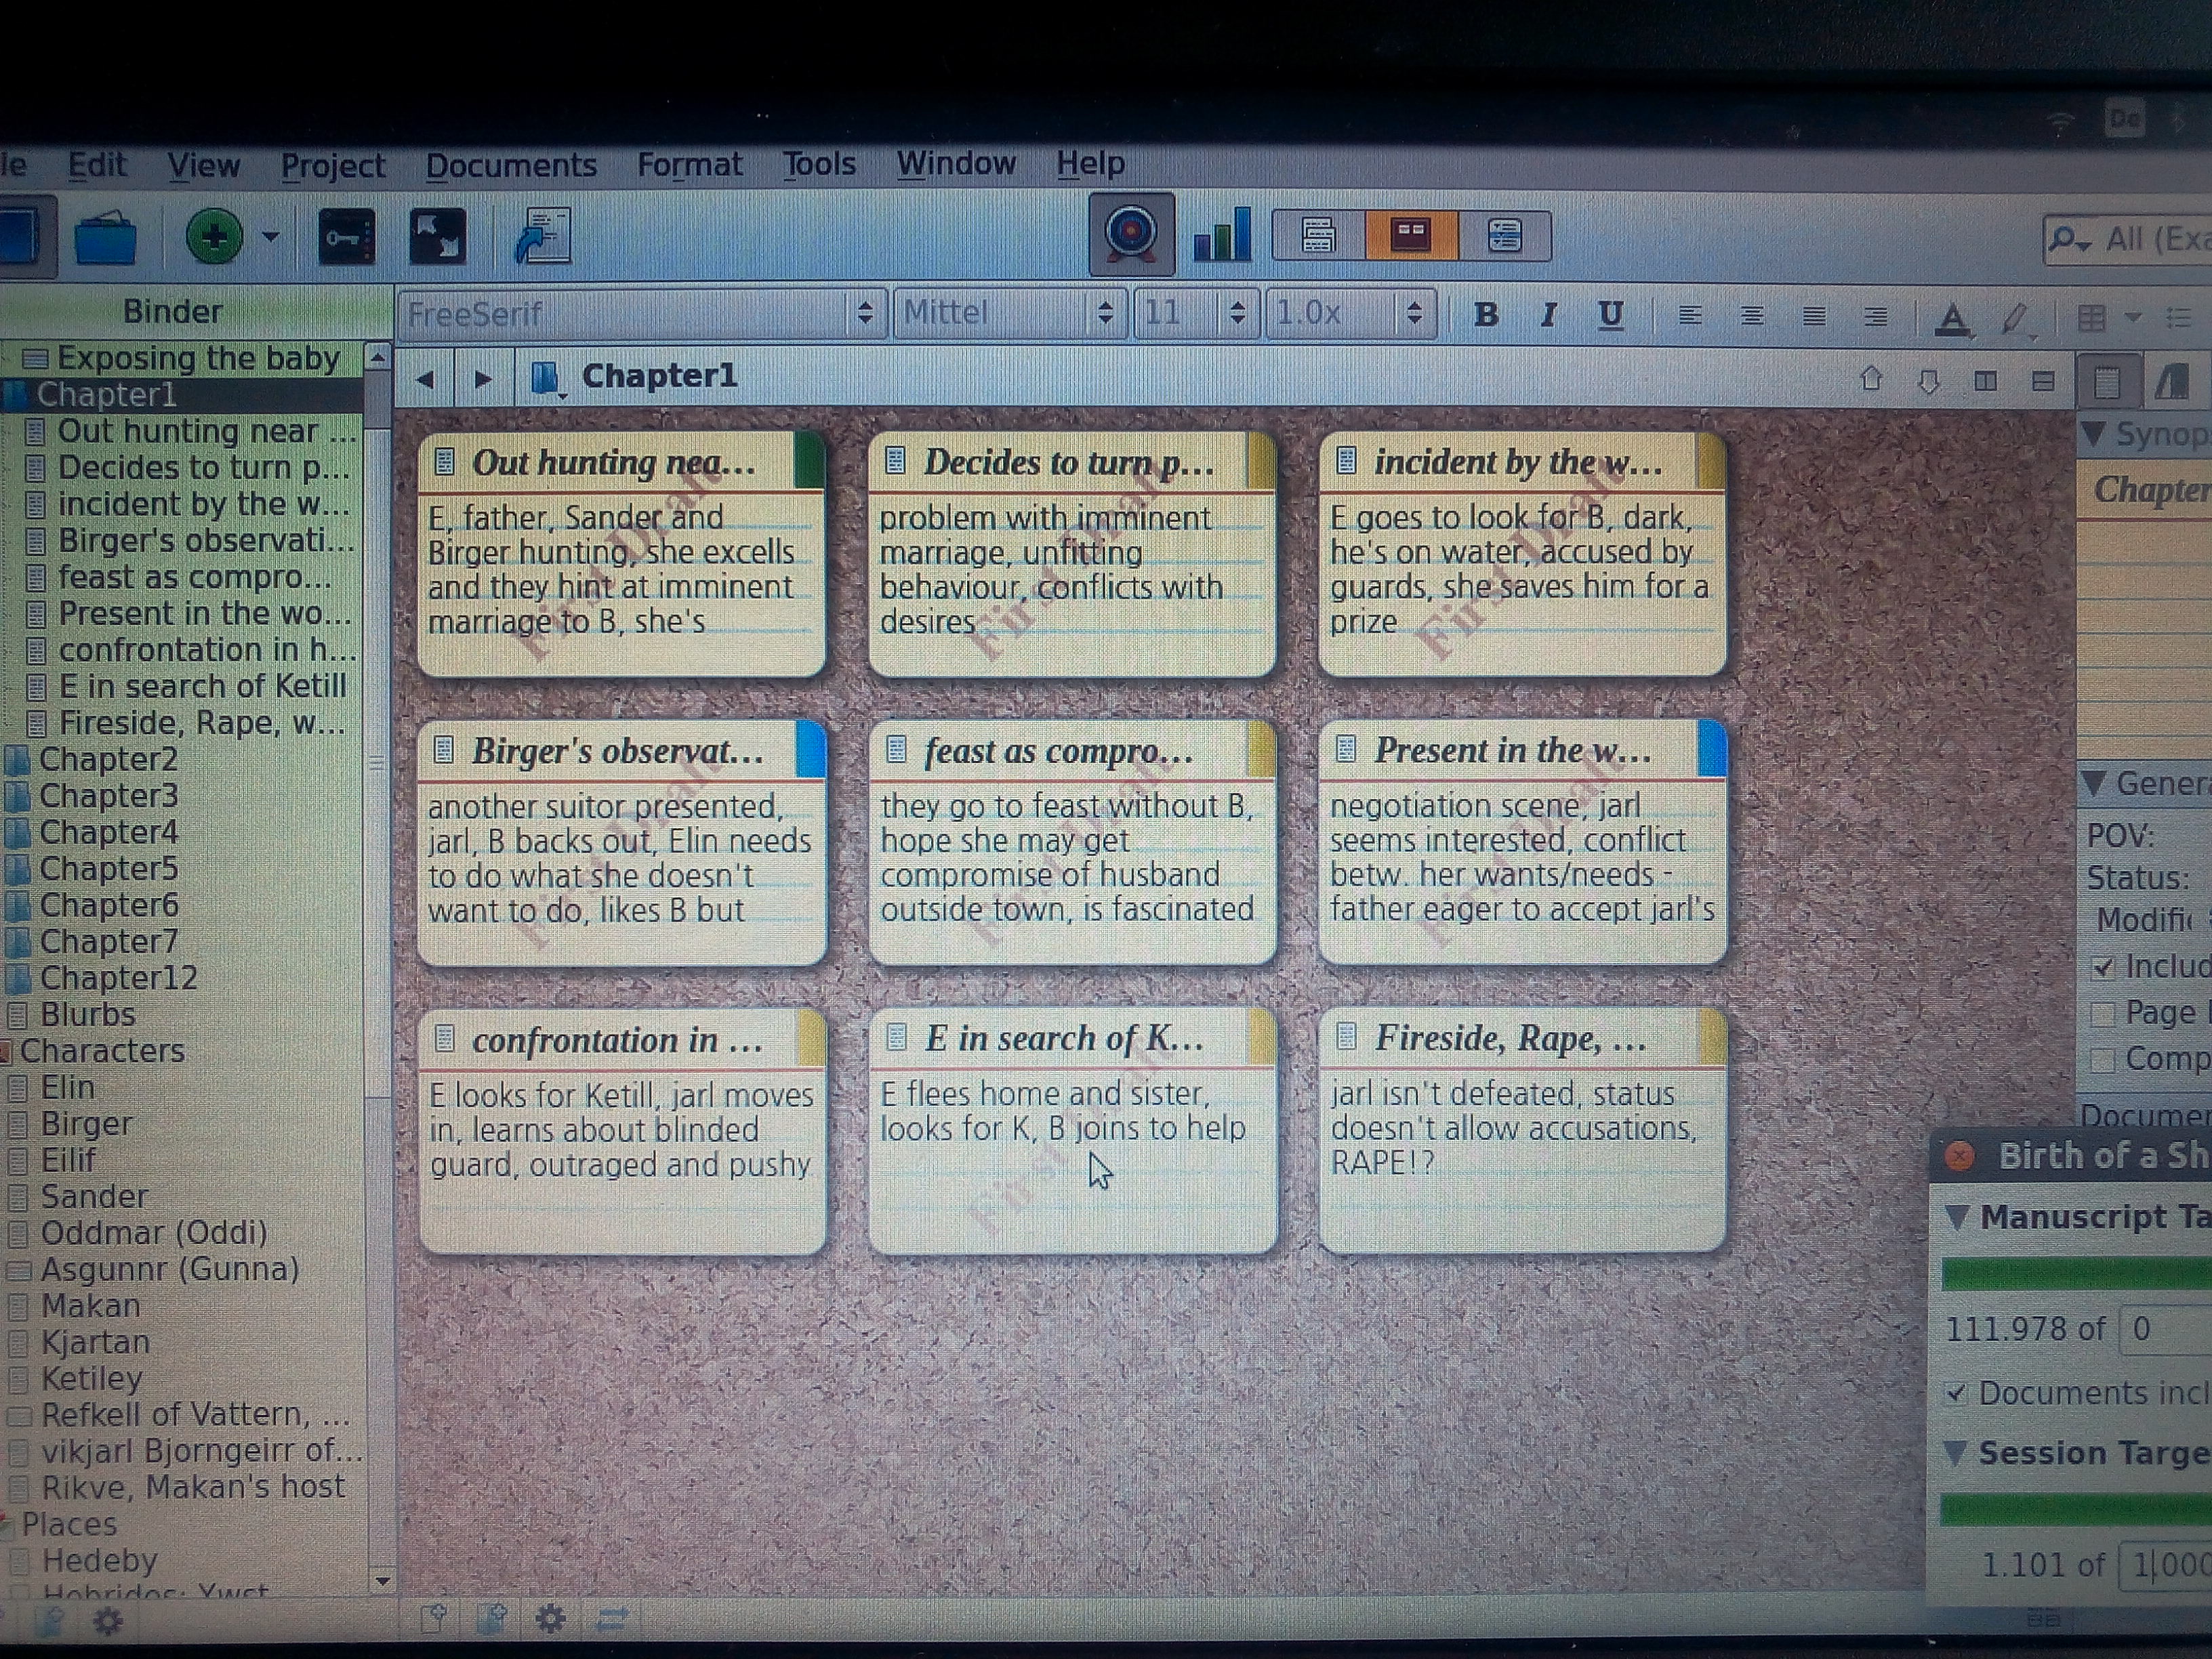
What is that corkboard option (highlighted in orange)?
Have fun with your corkboard!
To sort my chapters and to get a handy summary for each one, I use the “Corkboard”-option at the top middle of the project view (see above, the little orange button). It’s basically a virtual corkboard with synopses you can shuffle around and type into. They are your binder-content, but in a different view!
That way, you can insert more chapters or scenes between the existing ones (just double-click), or add more summary info for a quick reference to yourself. You can also add much more info there, if you want, such as POV for each scene (I did that with the coloured corners on each card), the state of the scene (first draft, second draft, etc., seen as diagonal “stamp” across the cards). This “metadata” is shown to the RIGHT in the Scrivener general project view (see above).
You can make changes to the “metadata” directly on the right side without leaving your text. While writing a scene, you can quickly click to change the POV or draft options (metadata), or the synopsis of the scene (above right).
In addition, you can insert notes to yourself for every scene (seen in the bottom right corner of general view). I do include notes all the time, and again, Scrivener lets me see those while I type, in that bottom right corner. I can also go forward to later scenes, and prepare them with notes. I love that.
So this is the RIGHT side, “Synopsis”, “General metadata” and “Document notes” explained. You change or ignore them according to your own needs.
What’s the “outliner” view for?
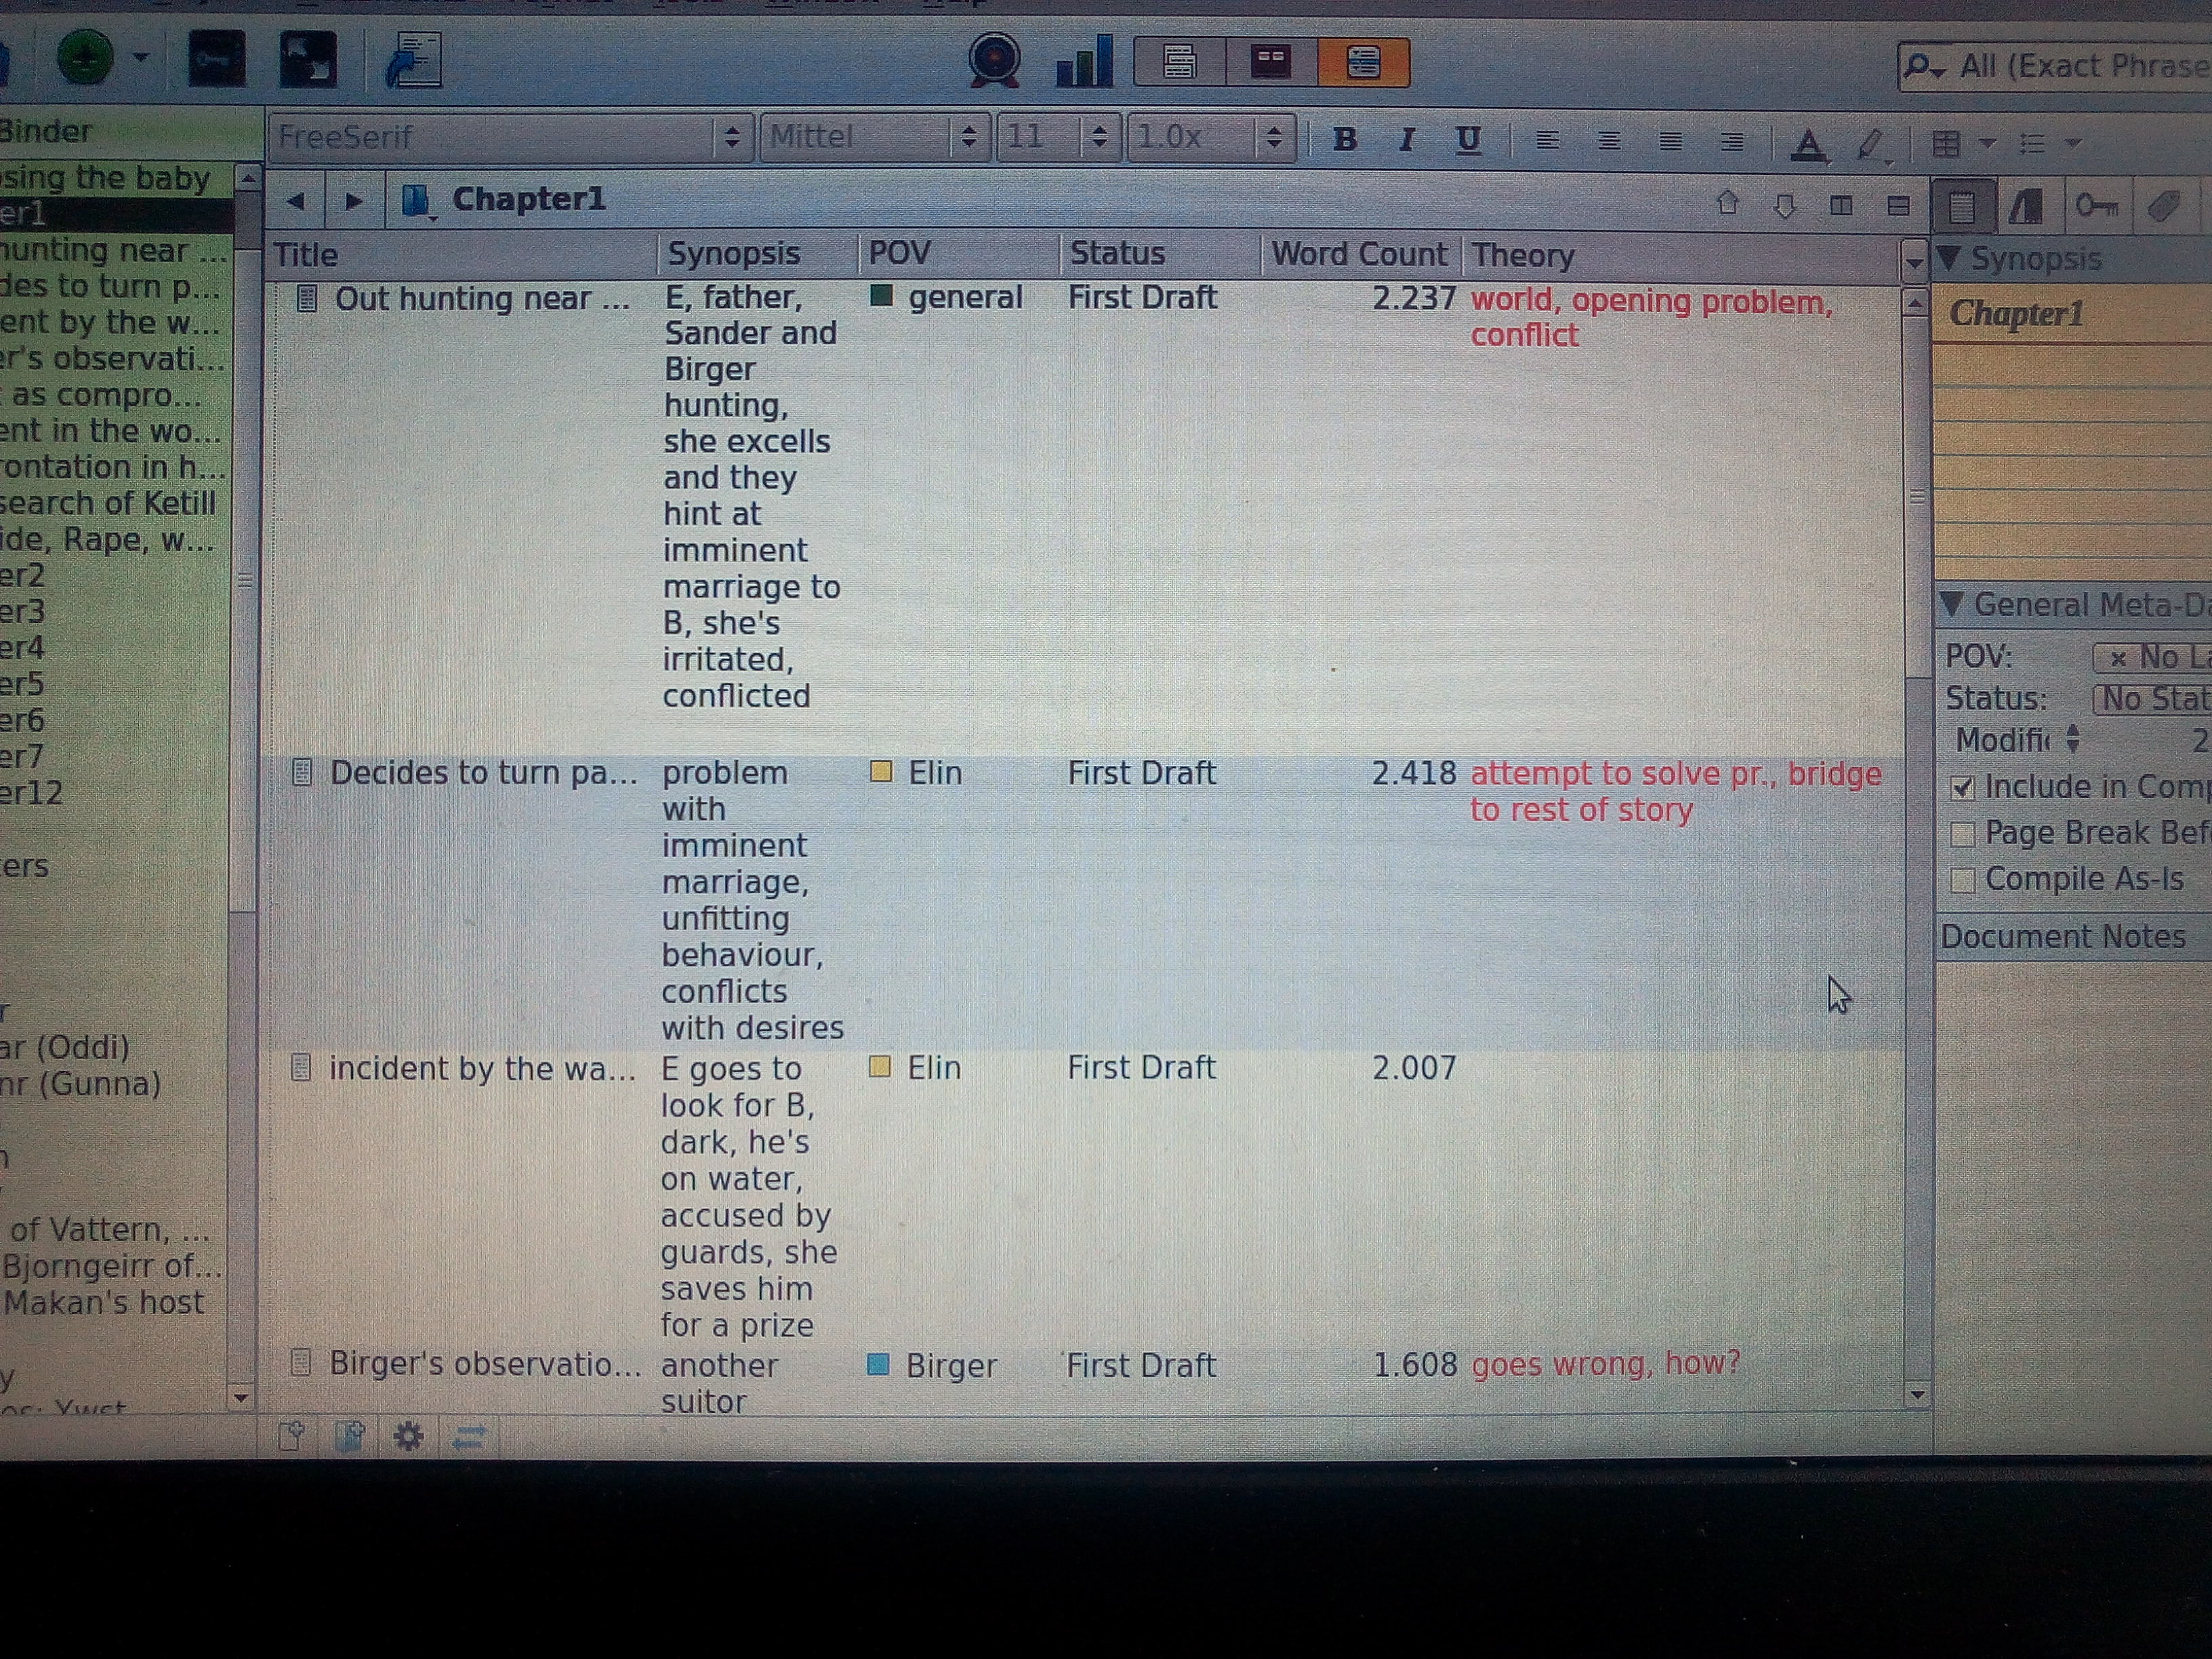
The outliner view – your planning page
Then there’s one more option that can come in handy for longer projects. You can see it at the top middle, highlighted in orange. It’s the “outliner” view, and can be very helpful for an overview, and for your outlining of novels or non-fiction. The outliner shows the subdocuments of a chosen group (e.g. a chapter-folder) with all their info, in table-format. You have the synopses, metadata, notes etc., all at a glance.
For example: I used the outliner to plan my novel roughly before I started writing it. You can see my structure-ideas on the right side of the outliner in red, I called those “theory”. I’m a pantser by heart, but for this project needed some structure to place my main scenes and events. Where should that “inciting incident” go (in my case, a rape scene), when should the “point of no return” be (my shieldmaiden’s sister is threatened), or where are the subplot-points surfacing (her love-interest)?
With the outliner view, I can always remind myself of the structure I had in mind, it even shows me the word count for each subdocument, and I can see how balanced the novel is.
From here, it’s all, “aaaand write!” – but don’t worry:
Scrivener is pretty damn good at saving your stuff
While you work, Scrivener does backups, takes snapshots, and stores the different layers of content (also metadata etc.) without you even noticing. Make sure you never change the location of all these files, so you can always re-open older documents if you want to make changes/edits. It’s a very thought-out structure I’m quite in awe of!
If you still are a bit daunted or apprehensive to give Scrivener a try, start small. You’ll learn by writing, and just playing around. Then there’s the manual, and very helpful forums of professionals and writer-colleagues always willing to help you out. I include myself there, although I’m definitely NOT a professional Scrivener user, but learned on-the-go and still am learning more each day. If there’s anything you want to know, leave a message below, or message me on Facebook or Twitter 🙂
I hope you’ll have fun with this great writing tool and maybe become a faster, more organised writer (even a kind of plotter!) – it’s what happened to me 😉
HAPPY WRITING!

Comments (0)